
Drawing the Cartoons
I first drew the cartoons I use for this blog about three years ago. The look of the characters has not changed much but the way I draw them has evolved a lot as I’ve learnt more about PhotoShop. I’ve always enjoyed playing with the program and it has been fun drawing the cartoons again. The complements I have received from different people have made both myself and my ego very happy. I’ve started giving serous thoughts to doing something more with the cartoons (as some of you have suggested) but no promises yet. However, since I’ve had a few requests to divulge how I draw them I thought it might be fun to make this post and show how I put them together.
I have a few tricks I use now for making the cartoons quicker but I’ll start at the beginning and come back to those tricks later.

I start by scanning the original hand drawn cartoon into the computer and tracing over it with the Pen Tool. It’s a great tool for drawing smooth curved lines by placing Anchor Points were curves should begin and end. After the Anchor Points have been placed the line between them can be adjusted with the handles to create a curve. Once I have a curve I am happy with I use the Stroke option to draw the line. Each body parts is created on a separate layer. I’ll come back to the reason for that later.
Then I create new layers behind each body part and use them to colour the image. I colour in behind the lines so I can get right up to the edge. Eventually I merge the lines and colour together but keep each body part on a different layer.
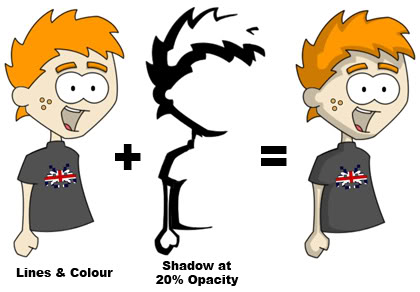
Next comes the shadows. This is also done on another layer (for each body part) but this time on top of all the other layers. I colour the areas where I want shadows with black and then set the opacity of the layer to 20%. This lets the colour and lines underneath shows through creating the look of shadows. The layers are then merged again per body part. This creates the finished character.
Now I’ll go back to those tricks I mentioned and the reason why I create each body part on a different layer. If you have a weak stomach and do not wish to see a cartoon character pulled limb from limb look away now.
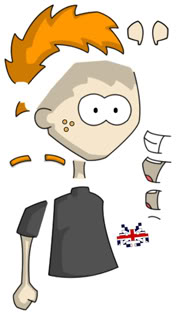
Having each body part separate makes it possible to create new images quickly by moving the parts around or re-drawing just one part. Each time I create a new part for a cartoon I add it to my library of parts in case it can be adapted for use again later.
I’ve put together a video to show how this all works. The first part is a quick demonstration of how I can use this process to make facial expressions. The second part shows how I turned my template image in to the cartoon used for today’s post. Click here to watch.


Hmm have you tried Adobe Illustrator, like Photoshop but way way easier. I use it for my design illustrations and something quite quick and easy takes seconds and looks the nuts :) got me through my degree when it came to exploded diagrams and orthographic drawings. It’s wonderful and discovering how to do new stuff on it makes me all tingley!!
Nice tricks, I’ve always despised using the pen tool, I can never learn. Using different layers por each body part is a very good Idea.
I personally use Alias SketchBook Pro 2 for my drawings using a Tablet Pc, then finish them off in photoshop.
Very clever!
Very nice. I’m gradually learning with Photoshop but sometimes it’s overwhelming when I realise how much I don’t know. :/
Great tutorial!
I’ve tried drawing figures on the computer, but I haven’t gotten very far. LOL :lol: . But I am proud of my hand drawn figures.:-)
They rock.
If you could think of a good way to do it you should make short films. Obviously if you have to do it frame by freaking frame though I can see why you wouldn’t :P But still – the video was awesome and the cartoons are great. How long does one take?
Crazy talent. I always wish that I had the patience to do things of that sort. About how long does each cartoon take to create?
Regarding your comment, I haven’t read The Timetraveler’s Wife… but it has been in the top sellers section of Barnes and Noble for about a year now… so I probably should get around to it.
that was really good!
i’m so gonna use these tips and tricks. by the way. have you tried illustrator? just wondering if it’s good.
Great stuff Stu. Thanks for sharing this with us. I’m going to go design my own ‘invaderstu’ now.
Matt.
Thank you everyone for the compliments :)
The one I did for the video took about 20mins in real time but some of the more complicated ones can take up to an hour. Making the first drawing I use as the template took a few hours.
I’ve only tried Photoshop so far but I’ll have to take a look at Illustrator.
That video was awesome!!!!! Thanks for sharing!!
What I always thought might be true has now been confirmed: I SUCK at photoshop.
Matt – I want royalty payments. The character is copy write to me :p
You are very talented Stu.
So did I JaG. It took me a while to work it all out. ItÂ’s not impossible to learn :)
Very cool post, dude!